Design your own QR code. Easy-peasy.
So, you’re looking for a QR code that isn’t boring – like those black and white squares you’ve seen for the last decade. Well, our custom QR designer helps you create custom QR codes with fancy, personalized details in a few simple steps.
Upload your logo or an image, adjust the colors, and change the QR’s shape to create a cool QR code ready to get more scans with your own brand’s unique style.
More scans? Tell me more.
When it comes to connecting offline to online, QR codes are the greatest thing since sliced bread. Of course, nothing happens until a scan is made.
The ultimate goal of your custom QR code design is to grab people’s attention: pique their interest, and have them pull out their phones to find out what’s behind the QR. In short: make the scan inevitable!
Too bad most QR codes look the same. A square-shaped, simple black and white QR is like every other red apple. By customizing your QR code design, you differentiate yourself from the crowd like a purple apple, increasing your visibility, becoming unique, and being more easily recognizable.
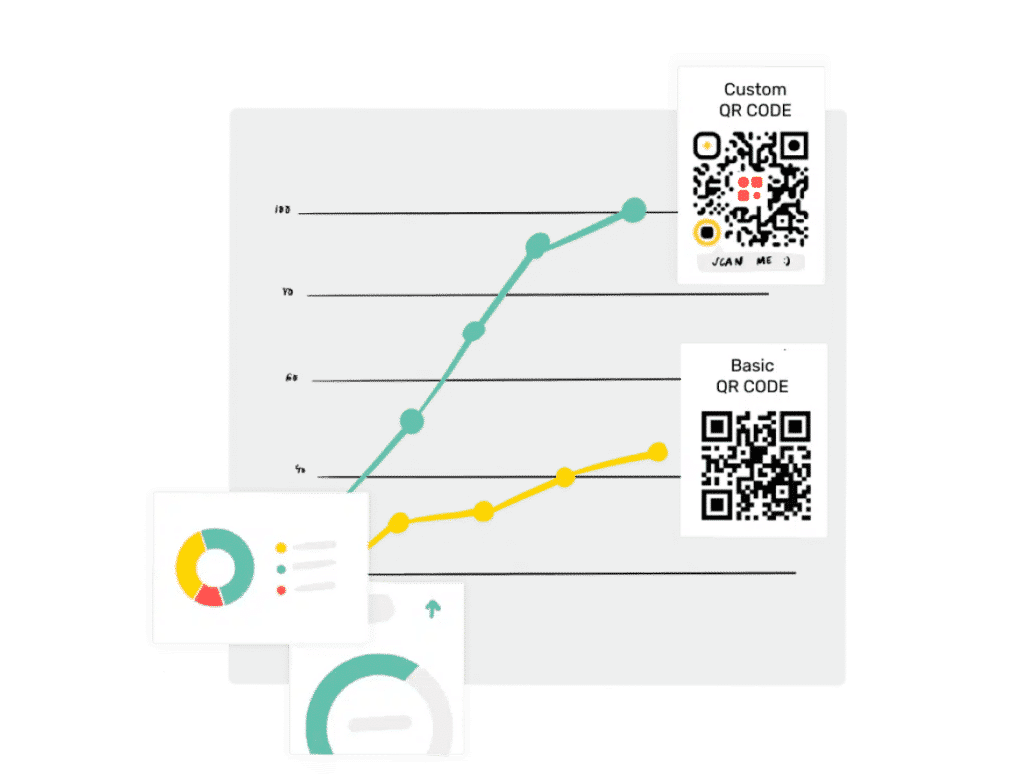
Custom QR codes receive up to 200% more scans, giving you a competitive advantage. It’s like a call-to-action to get even more scans.
To make your QR blend with your brand and to impress your audience, don’t look further than our custom QR code generator with logo.
When you look at the QR codes in the following image, which one would you scan?
Make your own QR code with logo
From Coca-Cola to Starbucks, worldwide brands use custom QR codes with logos in their marketing. Because a creative QR code, works!
A stylized QR code design with your logo will help you increase your brand’s visibility, scans, and results. Get a customized, cool, fancy QR code with the high-quality designing capabilities of our custom QR code maker with a logo.
Create QR code with logo in center (or image)
A QR code with a logo in the middle is the most common custom QR design, but you can also use an image or insert text as a call-to-action. To generate a QR with a logo:
- Pick or add your brand logo, icon, image, silhouette, or text. Even a person’s portrait if you’re creating a digital business card.
- Resize it to find the best design. Square images work best.
- You’re set!
Pro tip: if you don’t add a QR logo, you can pick an icon representing the action behind the QR code. For example, if you want people to visit your Instagram profile, use Instagram’s icon as the logo. And if you don’t add any central image, you can still make it colorful and place your QR inside a frame with a call-to-action.
Set a custom color QR code
Customize your QR code colors to match your brand or a specific campaign’s color palette. You can apply solid colors or gradients to the QR background, to its pattern, and also to its “eyes” (the blocks at the corners of the QR code). Alternatively, you can create a QR code with a transparent background.
- Pick a solid pattern and background color.
- Or go with a color gradient between two colors.
- You could also merge it with a background image.
Pro tip: as long as you keep a high contrast between patterns and background colors, the QR code should maintain its readability, but keep in mind that you should not invert the colors as a dark background with light code patterns will not be readable by some phones. So always test it before putting it to use!
Design a custom shape QR code
Generating a unique, visually attractive, and fancy QR code doesn’t have to do with just colors. You can create a custom QR code shape by changing how the different elements of the QR code look.
Our custom QR code designer allows you to play with the QR pattern and the QR eyes (the blocks at the corners of the code). You can make them more rounded or circular, more square, and use spikes, crosses, or dots. Anything to make the QR code match your brand identity better, make it fit a campaign or a graphic design, and turn your custom QR code into an attention magnet.
Pro tip: it’s better not to mix rounded and spikey shapes too much to keep your custom QR code easy on the eye. Don’t “over customize” your QR code, but always try to make it blend seamlessly with its context in the printed material you plan to use.
Use a QR code frame and add a CTA
Enclosing your custom QR code in a frame is always a good idea. A frame will make your QR code stand out better and will eventually bring more scans. In addition, a frame also preserves the “quiet zone” (a free space around your QR code), making it easier for phone cameras to scan the QR.
You can apply different frame styles and colors to reflect your brand identity or personal taste. But it doesn’t end here: you can also add a CTA (call-to-action) inside the frame, like “Scan me for a discount” or “Watch a video,” according to the destination of the QR code. A compelling CTA can dramatically increase the number of visits that your custom QR code receives.
Pro tip: keep your CTA under 3-4 words for the best result. Always start with a strong verb, like “Scan,” “Get,” “See,” or “Win.”
Reusable QR code design templates
With our custom QR code designer, you can save your customizations as a QR code template that you can apply to all your QR codes and projects.
Let’s say you put a lot of effort into creating an incredible custom QR code design, with your logo in it, beautiful colors, a unique shape, and a well-paired frame with an irresistible CTA. Recreating it from scratch for another QR code would be highly annoying.
Enter the QR code templates: the perfect solution to recycle and reuse your QR code designs to make all codes in the same campaign consistent and recognizable, quickly set up recurring campaigns, and keep your printed materials tidy and visually satisfying.
Pro tip: as you edit your template in our custom QR code design tool, you will see how your QR code would look in real-time after each change you apply. We will also tell you if the code seems readable or not at every single step.
Branded QR codes
Branding your QR codes with your logo and colors can increase your brand identity recognition and recall. Create a unique QR code look to use across different channels and give consumers peace of mind in the safety of your QR codes. Even while someone could counterfeit the QR code design, you could also use a custom domain, eliminating any doubts about the legitimacy of your QRs.
Branded custom QR codes are a great way to share information on your products or their packaging without cluttering designs. Make the QR fit right into your brand experience. Branded QR codes look more professional, high-quality, and trustworthy.
Which one would you scan?

Always test your custom QR code readability
This is so important that it bears repeating: test, test, test.
Use multiple phones.
Use both iOS and Android.
Make sure your code is scannable before you print it out hundreds of times.
Suppose you find a mistake with the content of the code (like, it links to the wrong video on your YouTube channel), that’s not a problem at all! You can just edit the content of your QR code and it will not affect the QR’s design. There’s no need to reprint it.
Custom QR code FAQs
How do I create a custom QR code?
Go to a custom QR code maker like ours (hint, hint). Choose a QR code solution for what you want to share and customize your QR by adding your logo and changing colors and shapes. Scan it to ensure it works and download it for your digital, TV, or print campaigns.
Are custom QR codes free?
Yes, QR codes are free to use and can be created online with several QR code softwares. But most free QR codes are static, and usually, those platforms that provide dynamic QRs for free do it in exchange for displaying ads on your QRs. If you still want it free, choose a reliable solution that won’t be gone tomorrow and leave you hanging.
How much is a custom QR code?
Our Starter plan with two custom QR codes is $4.95 a month, billed yearly. Our Standard plan with 100 custom QR codes is $14.95 per month, billed yearly (you save 20%). Our Professional plan with 1,000 custom QR codes, unlimited scans, and advanced analytics is $39.95 per month, billed yearly (you save 20%).
If you need more QR codes, you can enquire about our Enterprise plans.
How do you make a QR code look cool?
Reread this entire page. Just kidding! Apply your brand colors to the custom QR codes, or look for colors with good matching contrast. Add your logo in vector format and set it to take 30% of the QR size. Use a plain white background with some space around the code, and frame it with your call-to-action.
How long do custom QR codes last?
Custom QR codes last forever. Seriously! Custom QR codes don’t expire. Remember that if you created a personalized QR with a dynamic QR code generator like QR Code KIT (we recommend dynamic QR codes since you can update them how many times you want and track your QRs), you would need a subscription to keep it working. But it’s worth it in the long run.